Together with Olga Boiko, the BODYART / FITNESS instructor, we picked 5 effective yoga asanas described step by step so you could do them correctly and get maximum benefit for your whole body.
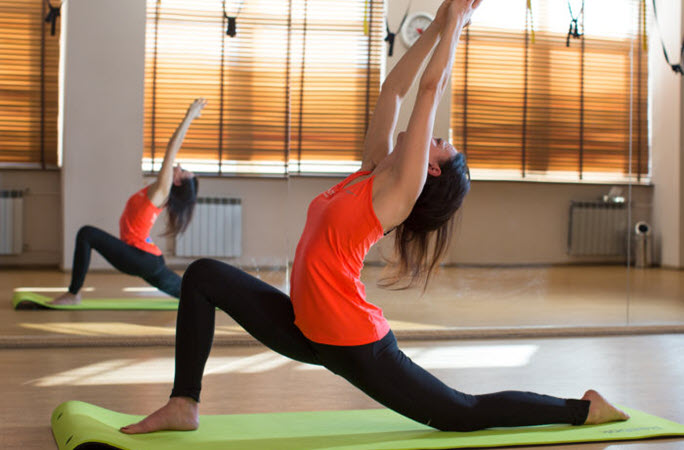
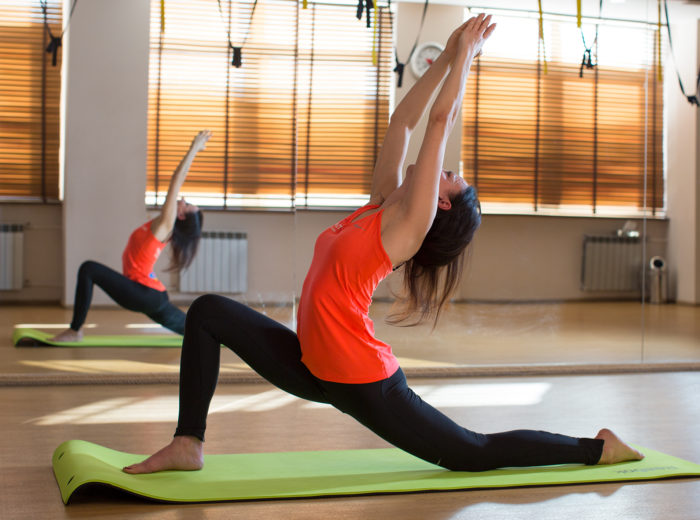
1. Crescent Lunge Pose, or Anjaneyasana
Benefits
Rotates and stretches the deep muscles of the pelvis and lower back muscles, strengthens leg muscles. It relaxes the chest, increases the mobility of the shoulder girdle, develops the flexibility of the spine and creates beautiful posture.
How to perform
- Perform Downward Facing Dog pose. As you exhale, step with your right foot forward and land it between your hands and make sure your right knee is aligned over the heel. Lower the left knee so that it touches the floor while keeping your right knee fixed in place, slide your left hip back until you feel comfortable, stretching your left thigh and groin. Rest the top of your back foot on the floor.
- Inhale and lift your torso to upright. Simultaneously, sweep your arms out to the sides and up to the ceiling, perpendicular to the floor. Draw your tailbone down toward the floor, with the pubic bone as if trying to reach your belly button.
- Open up your chest and reach it up with the shoulders fixed.
- Gently throw your head backwards and gaze slightly upward. Do not tense your neck. Reach your pinkies toward to the ceiling. Hold this position for a minute.
- Exhale your torso back to the right thigh, your hands to the floor and uncurl your left toes.
- With the next exhale, lift your left knee from the floor and step back to Downward-Facing-Dog. Repeat the exercise for the second foot.
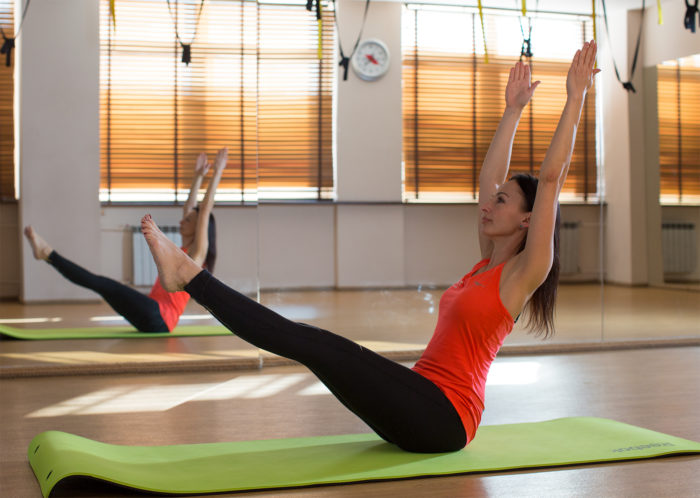
2. Boat Pose, or navasana
Benefits
Strengthens the muscles of the abdominals, pelvis, back and thighs. Unlike usual ab exercises, it does not make abdominal wall look massive and thick.
How to perform
- Sit right on your buttock with your legs extended in front of you, tightly pressing them together and pulling your toes towards your knees (dandasana).
- With an exhalation back slightly and simultaneously take your legs off the floor. Pull up your knees, point your toes away from you and make sure your leg muscles are tensed. Balance on your buttocks and do not lower your back to the floor: no vertebra should touch the rug. Keep the angle between your legs and the floor to below 90°. Keep your feet higher than the head level.
- Take your palms off the floor and stretch your arms up. Make sure your arms are parallel to each other, and your palms facing each other.
- Stay in a pose for 30 seconds. Keep normal breathing. Gradually increase your time in the asana to 1 minute. Navasana is effective only if you stay in it for at least 20 seconds.
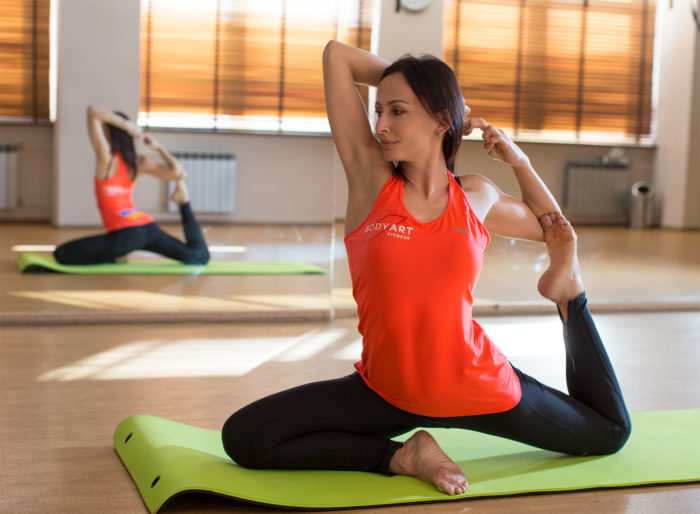
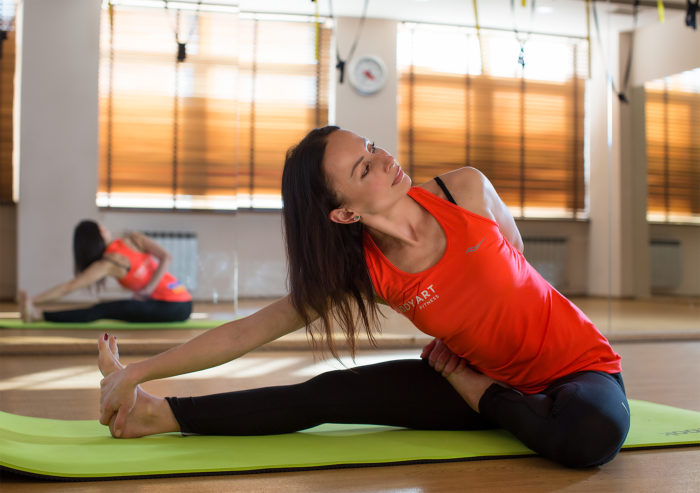
3. Half-Lotus Pose, or Ardha-Baddha-Padma-Paschimottanasana

Benefits
Stronger knee joints. Stretches back muscles and eliminates slouching.
How to perform
- Sit right on your buttock with your legs extended in front of you, tightly pressing them together and pulling your toes towards your knees (dandasana).
- Bend your left knee and place your left foot on your right thigh. Make sure your left heel is pressed against your belly button, and your toes stretched forward. This is a half lotus pose.
- Reach your left arm behind your back and to your right side and at an exhale clasp your left foot’s big toe. If it is hard for you to clasp, push your left shoulder out of alignment to clasp.
- Reach your left knee to the right leg. Reach your right arm forward and grab the right foot with your hand.
- While inhaling, lengthen your spine and gaze upwards. Hold this position for a few seconds. Do not leave hold of the big toe of your left foot.
- With an exhale, bend your right arm, move your elbow to the side and at the same time lean forward. Lower down until the forehead, then the nose, lips and lastly the chin reach your right knee.
- Initially, your knee of the extended leg may come off the floor. Flex hip and thigh muscles and press the entire extended leg to the floor.
- Hold this position for 30 seconds to 1 minute. Breath evenly.
- At an inhale, raise your head and torso, release your feet, straighten your left leg and return to the position described in item 1.
- Repeat in reverse order, taking the same amount of time.
- If you are not able to grab the big toe of a bent leg, reach your hand forward and grab the foot of the stretched leg. Repeat the asana for the opposite leg.
4. Pigeon pose, or eka pada rajakapotasana
Benefits
Makes shoulder girdle stronger and helps to “open up” the chest. When regularly performed, the asana improves spine flexibility and tuns the endocrine system.
How to perform
- Sit right on your buttock with your legs extended in front of you, tightly pressing them together and pulling your toes towards your knees (dandasana).
- Bend the right knee in such a way that the foot touches the groin while the right knee resting on the floor in the perfect scenario.
- Gently slide your left foot back behind you with it being as straight as possible and the top of left foot resting the floor.
- Bend your left leg at the knee and place its foot in the bent elbow of your left arm. Draw the foot to the pelvis tightly, do a few cycles of breathing.
- While maintaining balance, reach your right arm behind your head and lock the fingers.
- Further open up your chest, breathe evenly. Hold the asana for 30 seconds. Then finish the pose and repeat the exercise for the opposite side.
5. Downward-Facing-Dog pose, or adho mukha svanasana
Benefits
Adho mukha svanasana is one of yoga poses to combat fatigue and re-energize. It is especially good after aerobic cardio workouts. The pose develops speed and soothes legs. It makes ankles stronger, shapes beautiful calves, makes the shoulder blades more mobile and helps relieve stiff shoulder joints. It helps rush blood to the head – it renews brain cells, improves the skin complexion. The pose also aids digestion and is good for the abdominal cavity organs.
How to perform
- Start in all fours: palms shoulder-width apart with fingers pointed forward, knees and feet shoulder-width apart, hips and arms perpendicular to the floor.
- With an exhale, bend in the lower back, press the floor away from you while lifting your pelvis back and up. Your arms, neck and back shall make one line allowing the internal space in each joint grow.
- Straighten your legs with the heels touching the floor.
- Hold the pose for 1 minute, then you can relax.
BODYART / FITNESS welcomes you to visit our schedules yoga classes.